Skagen Watch Care & Instructions
STANDARD DIAL INSTRUCTIONS
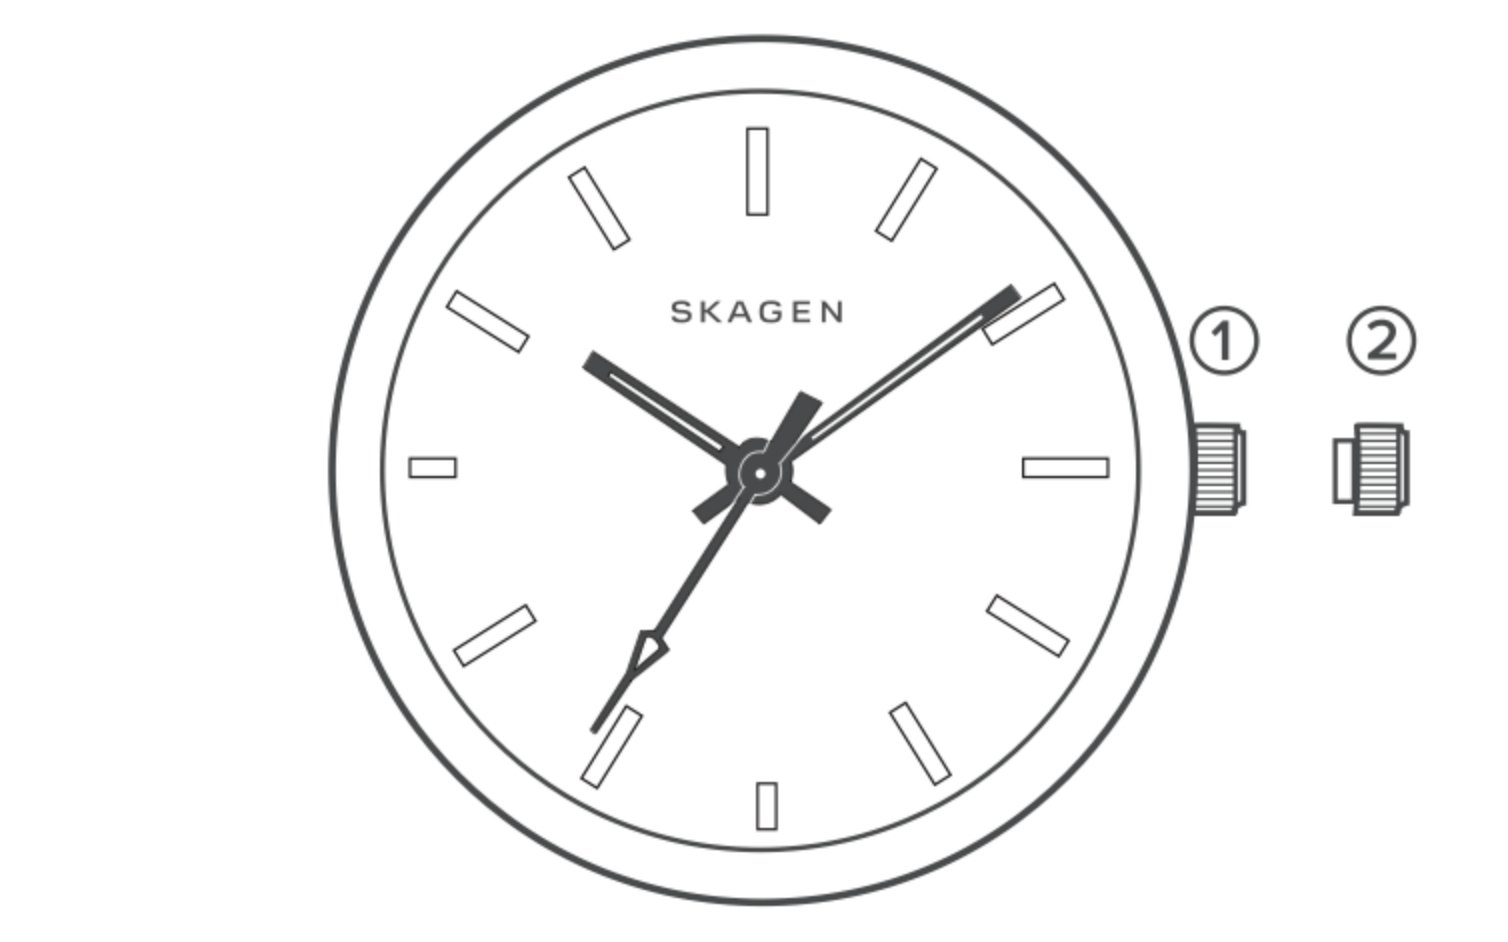
SETTING THE TIME
- Rotate the crown to set the date. (Either clockwise or counterclockwise depending on the model.)
- Pull the crown out to the fully extended 3 position and rotate to set the desired time.
- Push the crown back to its normal 1 position and the date and time are now set.
ONE HAND
SETTING THE TIME
- Pull the crown out to the 2 position when the small second hand is at 12 o’clock. The second hand will stop on the spot.
- Advance the minute hand by rotating the crown. The 24-hour hand will advance one hour for every full rotation of the minute hand.
- Push the crown back to its normal 1 position and the time is now set.
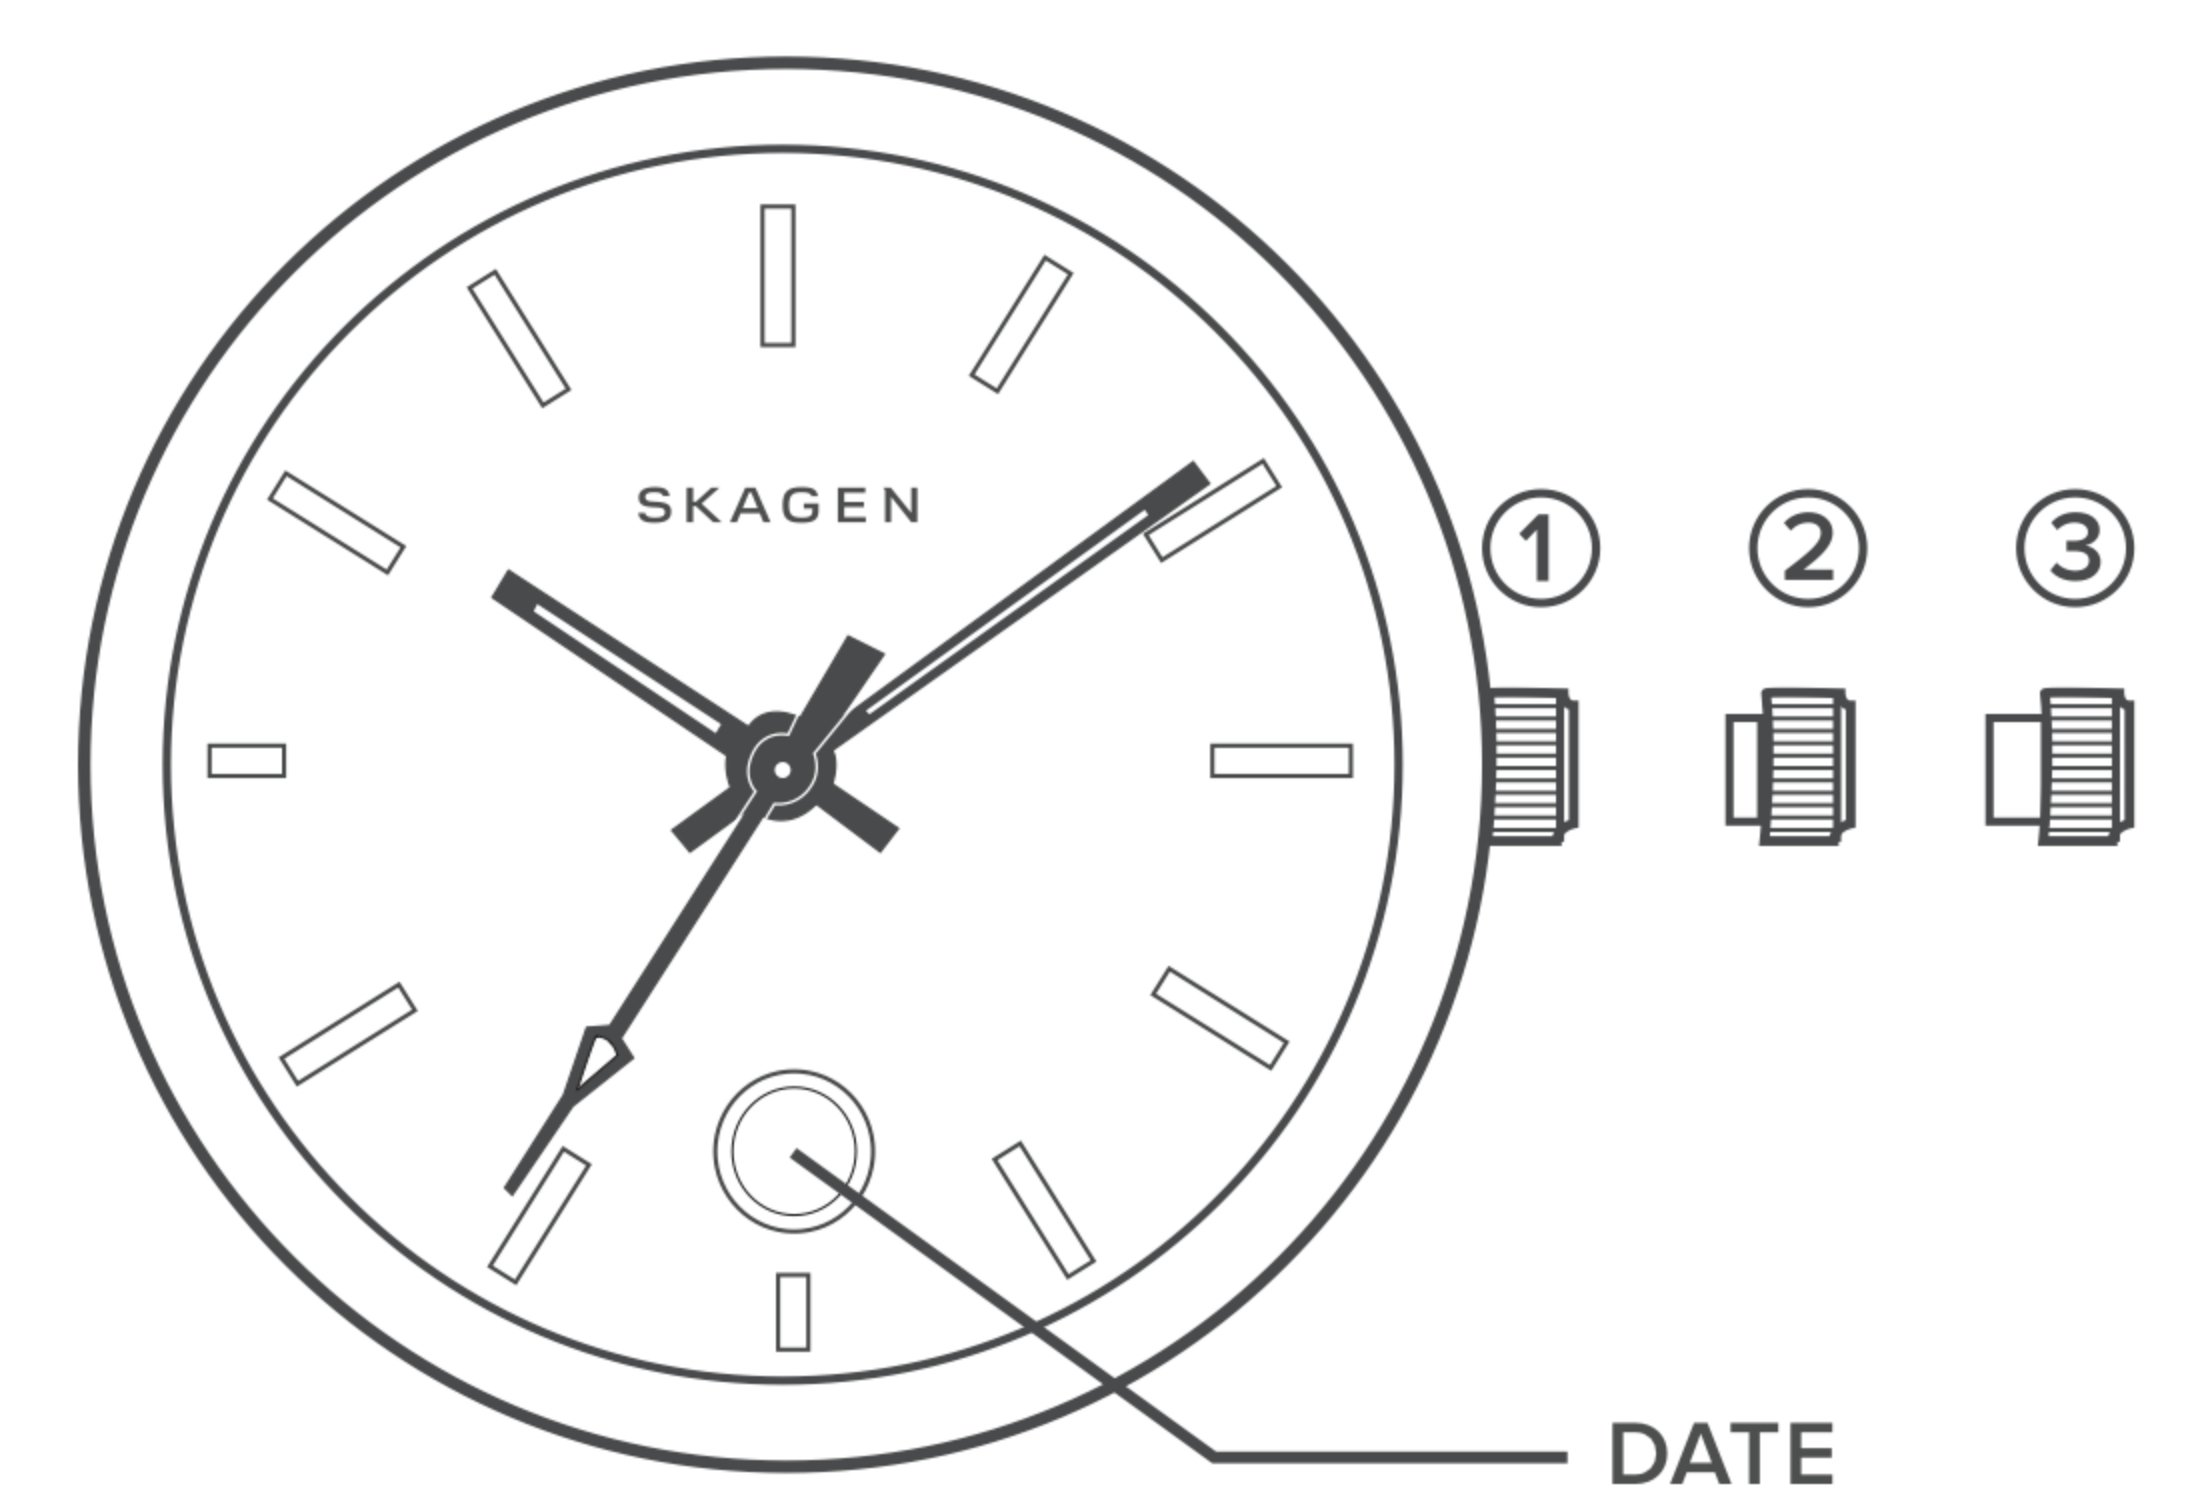
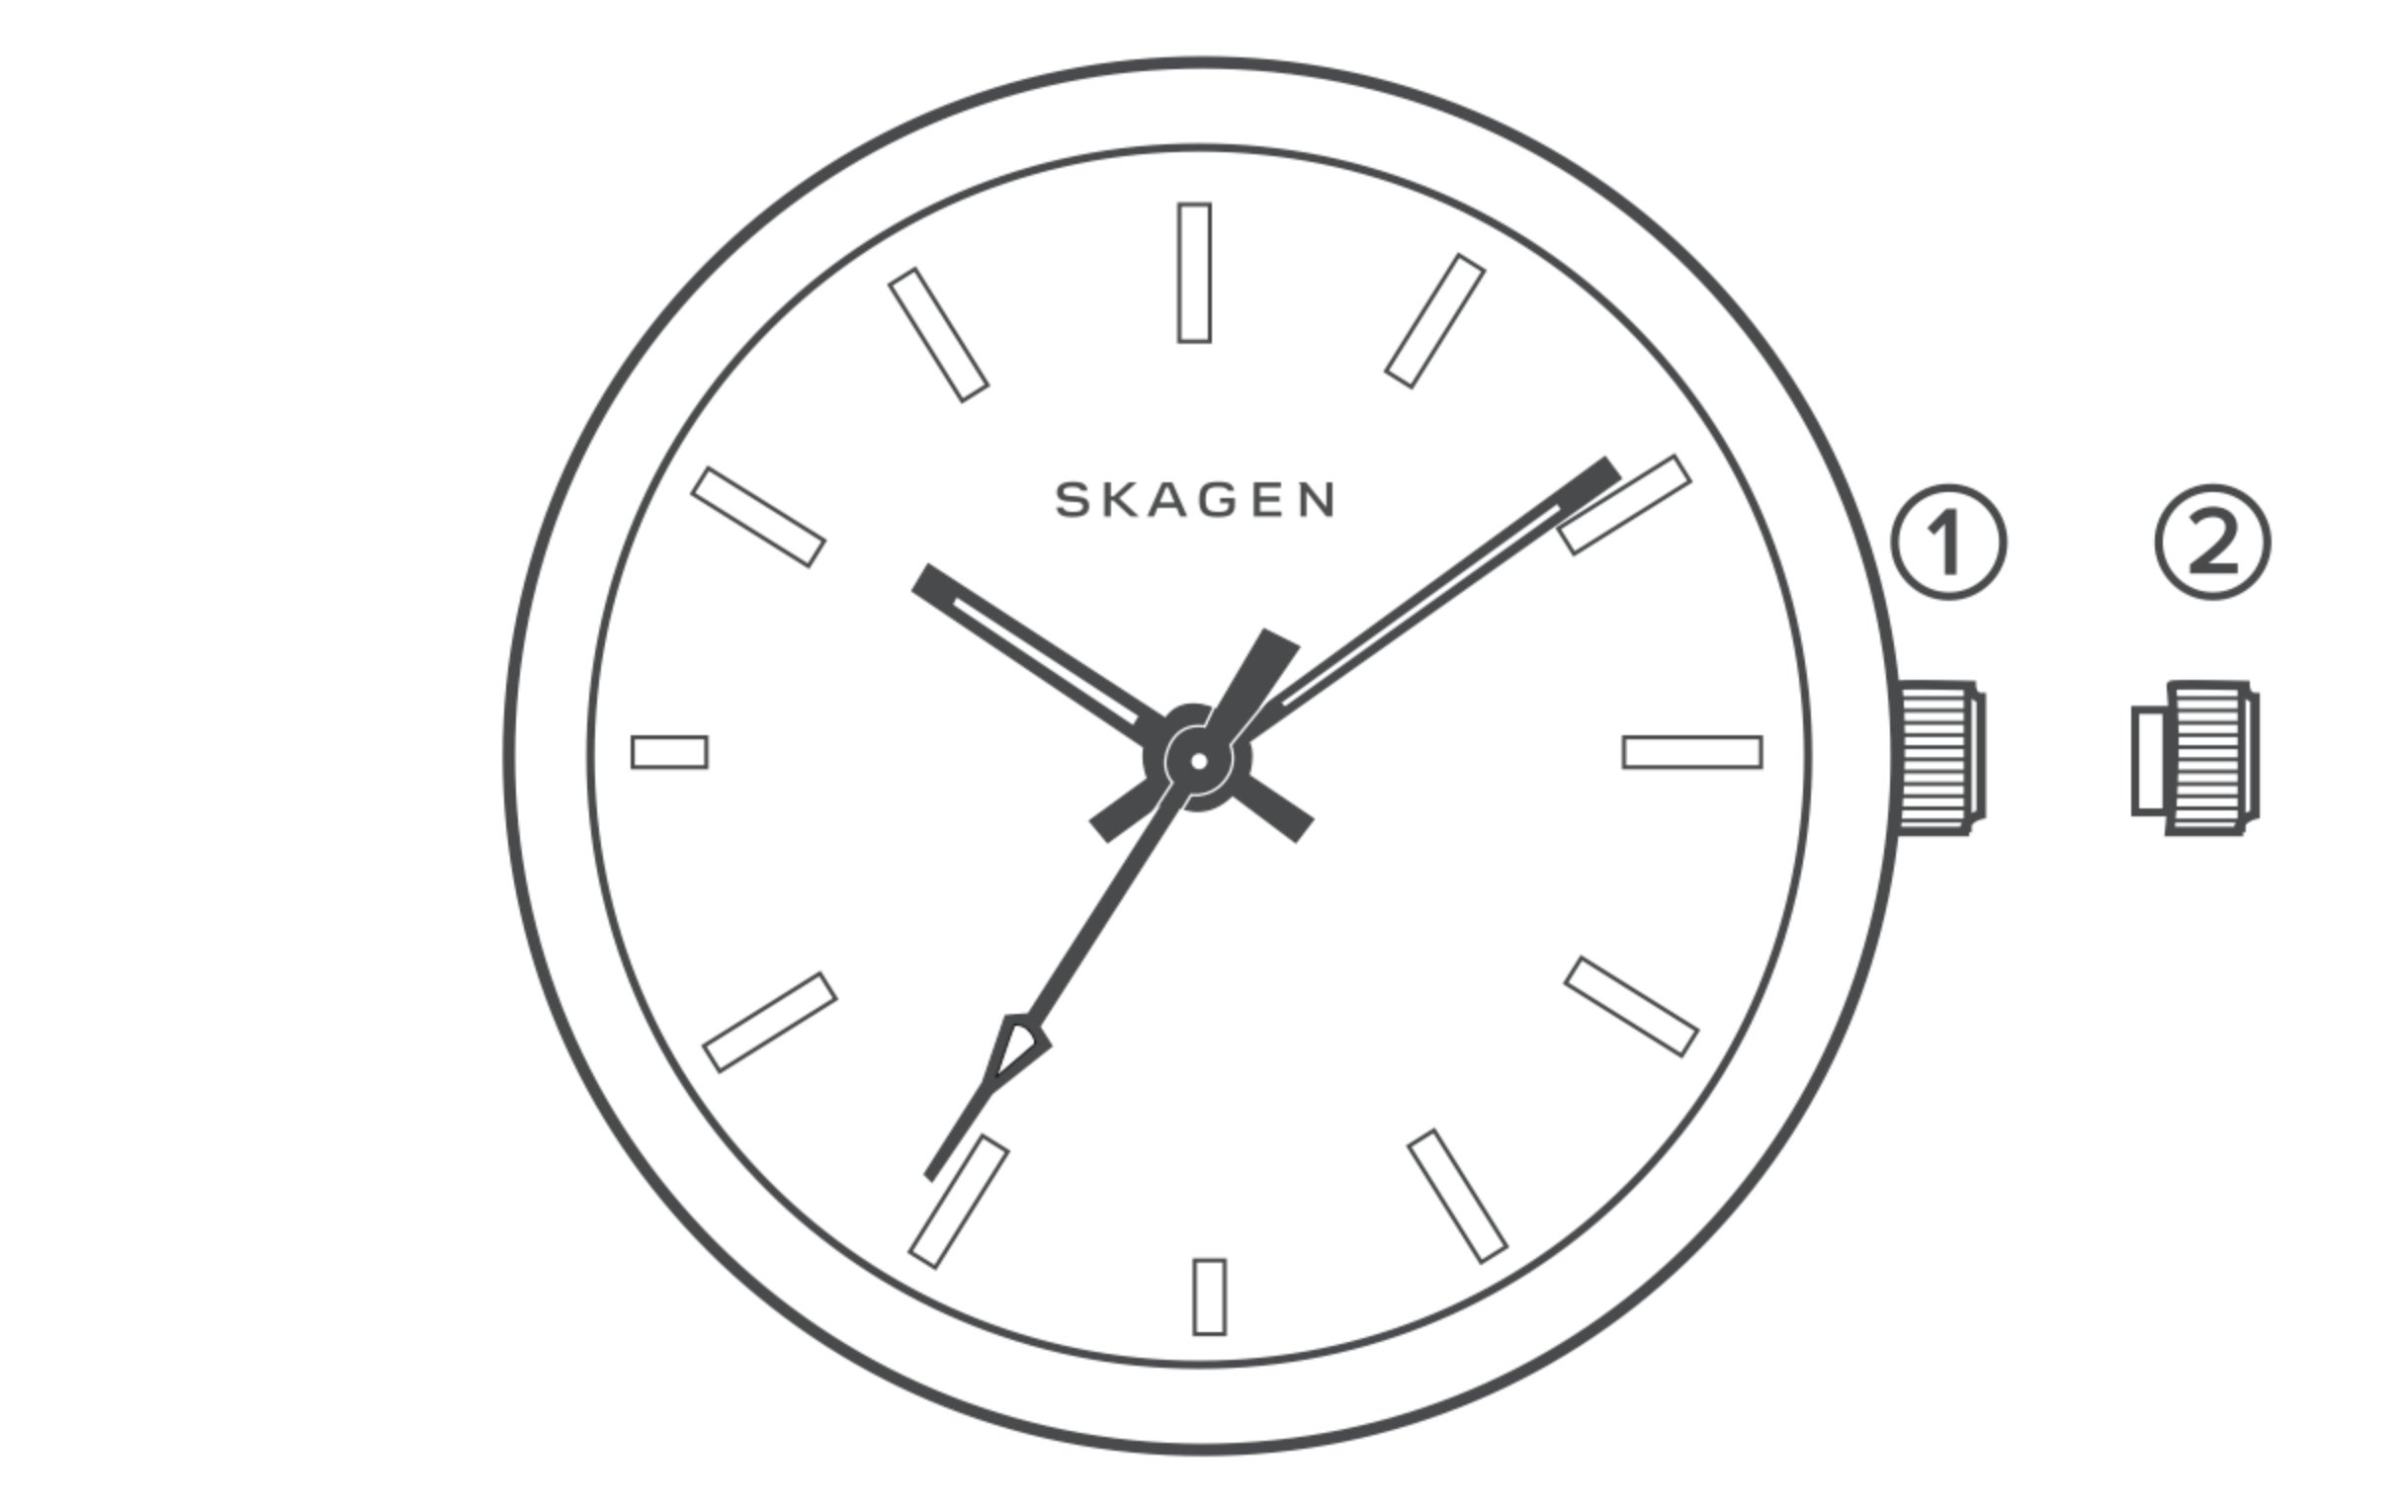
Three Hand Date
SETTING THE TIME
- Pull the crown out to the 2 position.
- Rotate the crown to set the date. (Either clockwise or counterclockwise, depending on the model.)
- Pull the crown out to the fully extended 3 position and rotate to set the desired time.
- Push the crown back to its normal 1 position and the date and time are now set.
Three Hand Day & Date
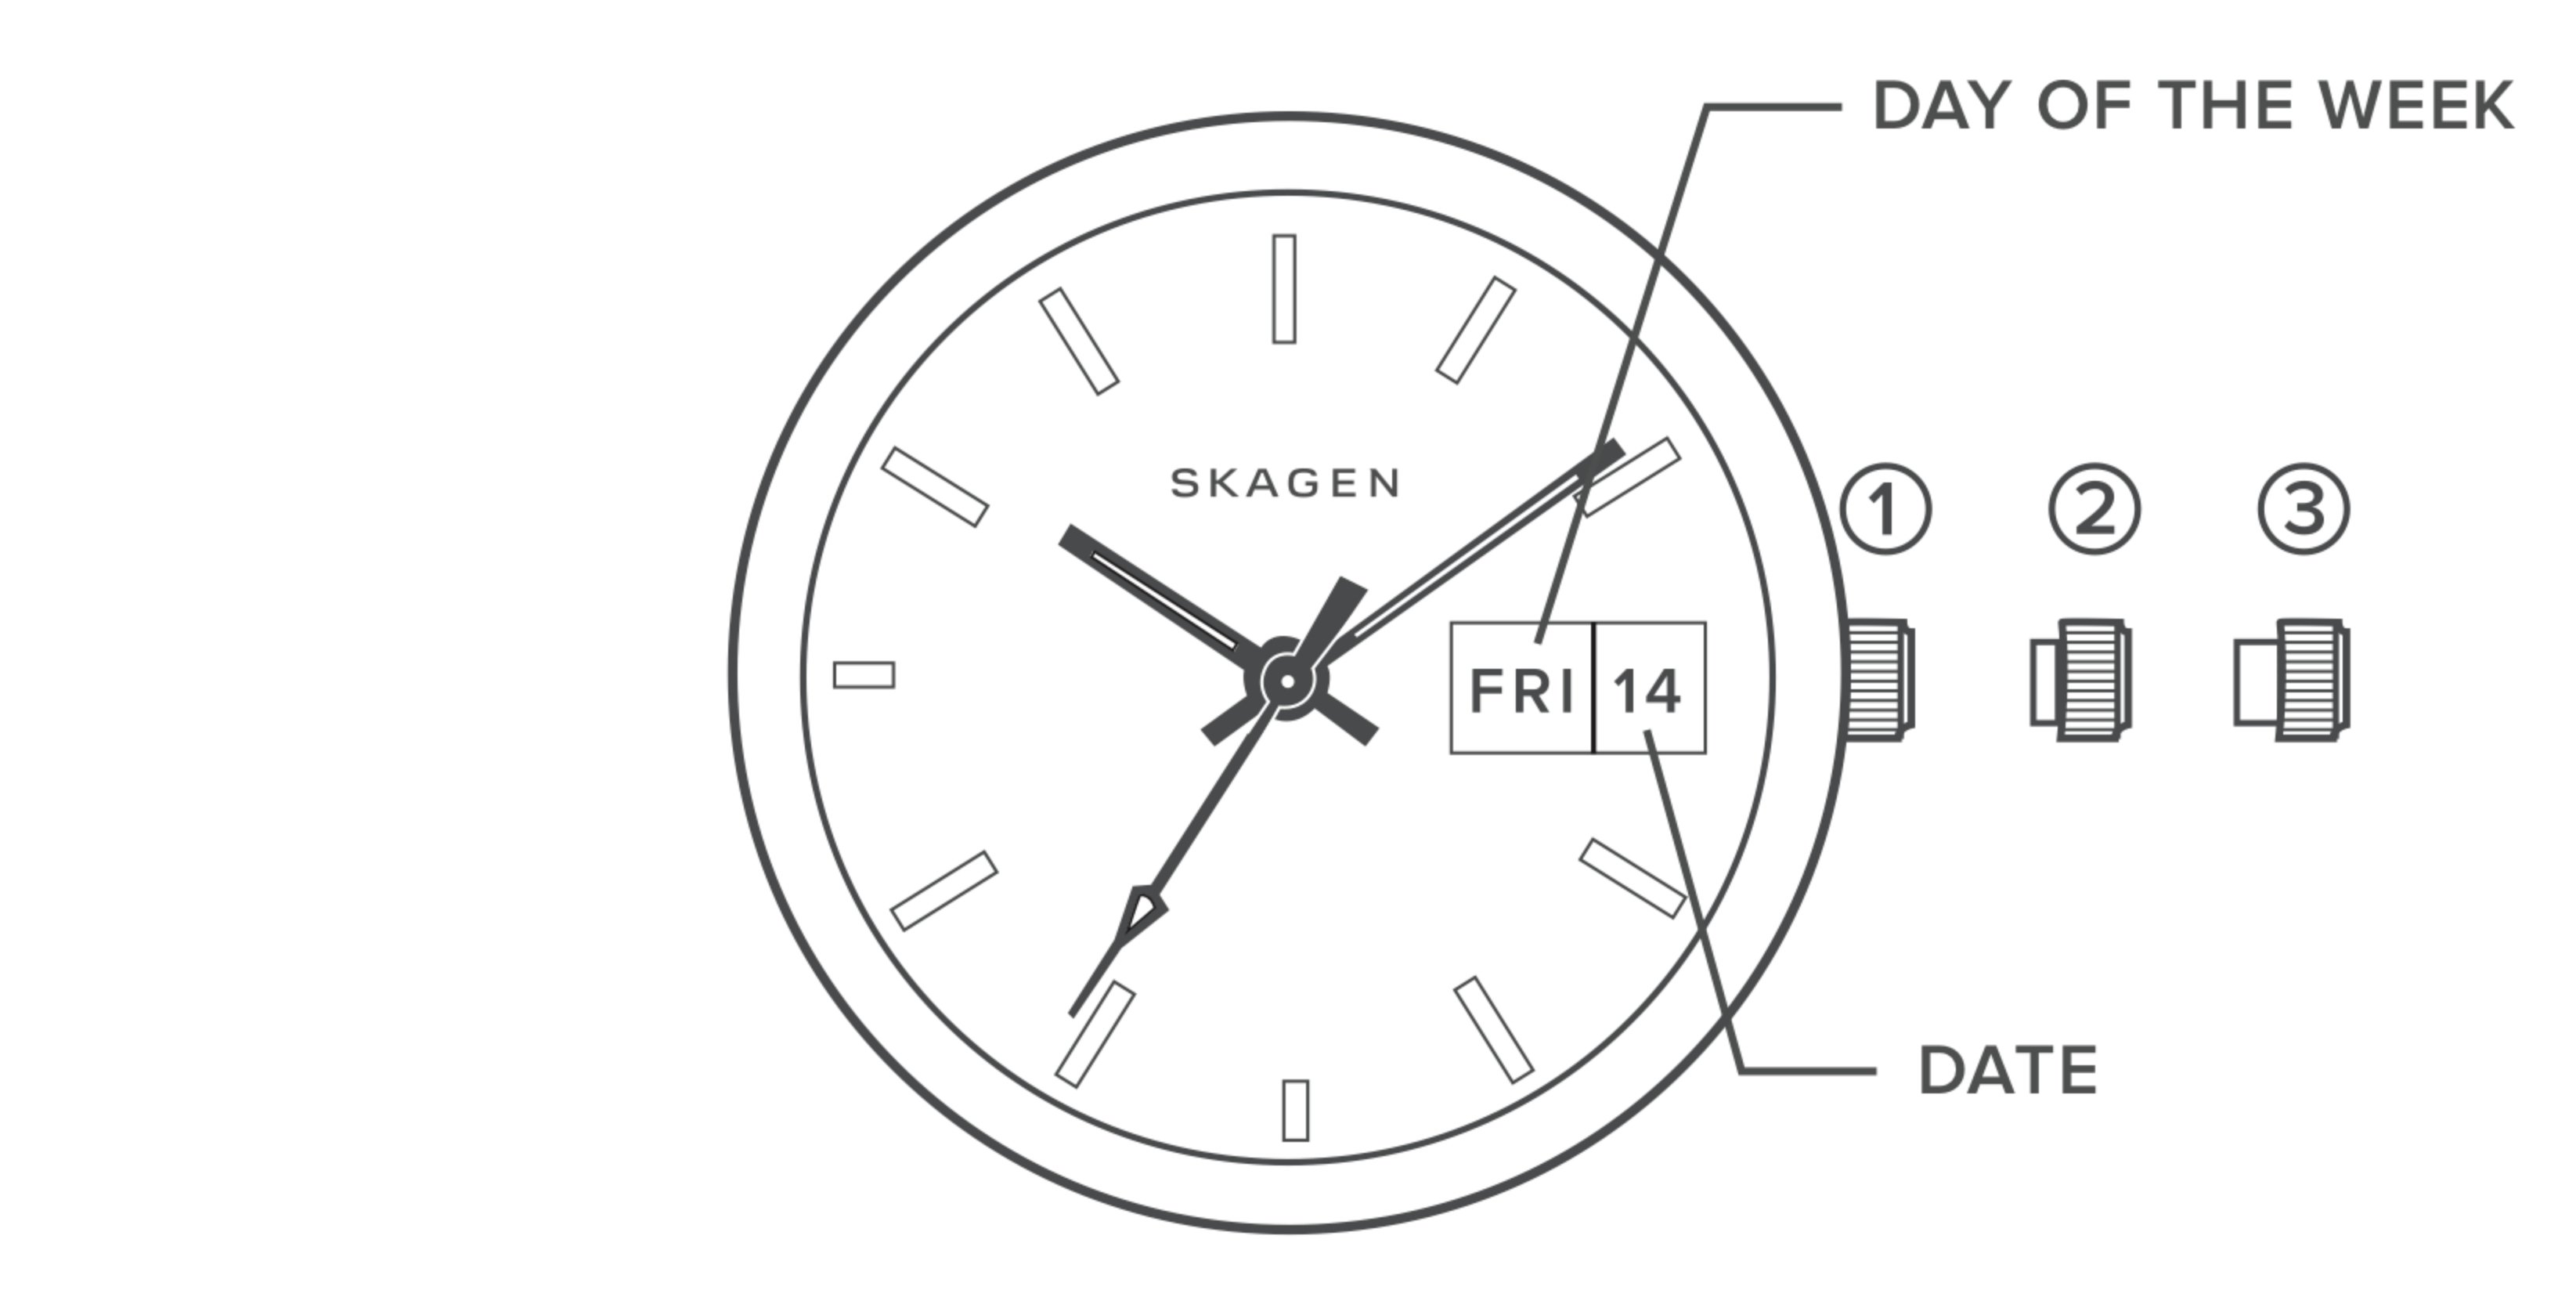
SETTING THE TIME
- Pull the crown out to the fully extended 3 position.
- Rotate the crown clockwise to set desired time.
- Push the crown back to normal 1 position and the time is now set.
SETTING THE DATE
- Pull the crown out to the 2 position.
- Rotate the crown counterclockwise to set date. *If the date is set between the hours of approximately 10:00 PM and 1:00 AM, the date may not change on the following day.
- Push the crown back to normal 1 position and the date is now set.
SETTING THE DAY
- Pull the crown out to the 2 position.
- Rotate the crown clockwise to set the day. *If the day is set between the hours of approximately 10:00 PM and 1:00 AM, the day may not change on the following day.
- Push the crown back to normal 1 position and the day of the week is now set.
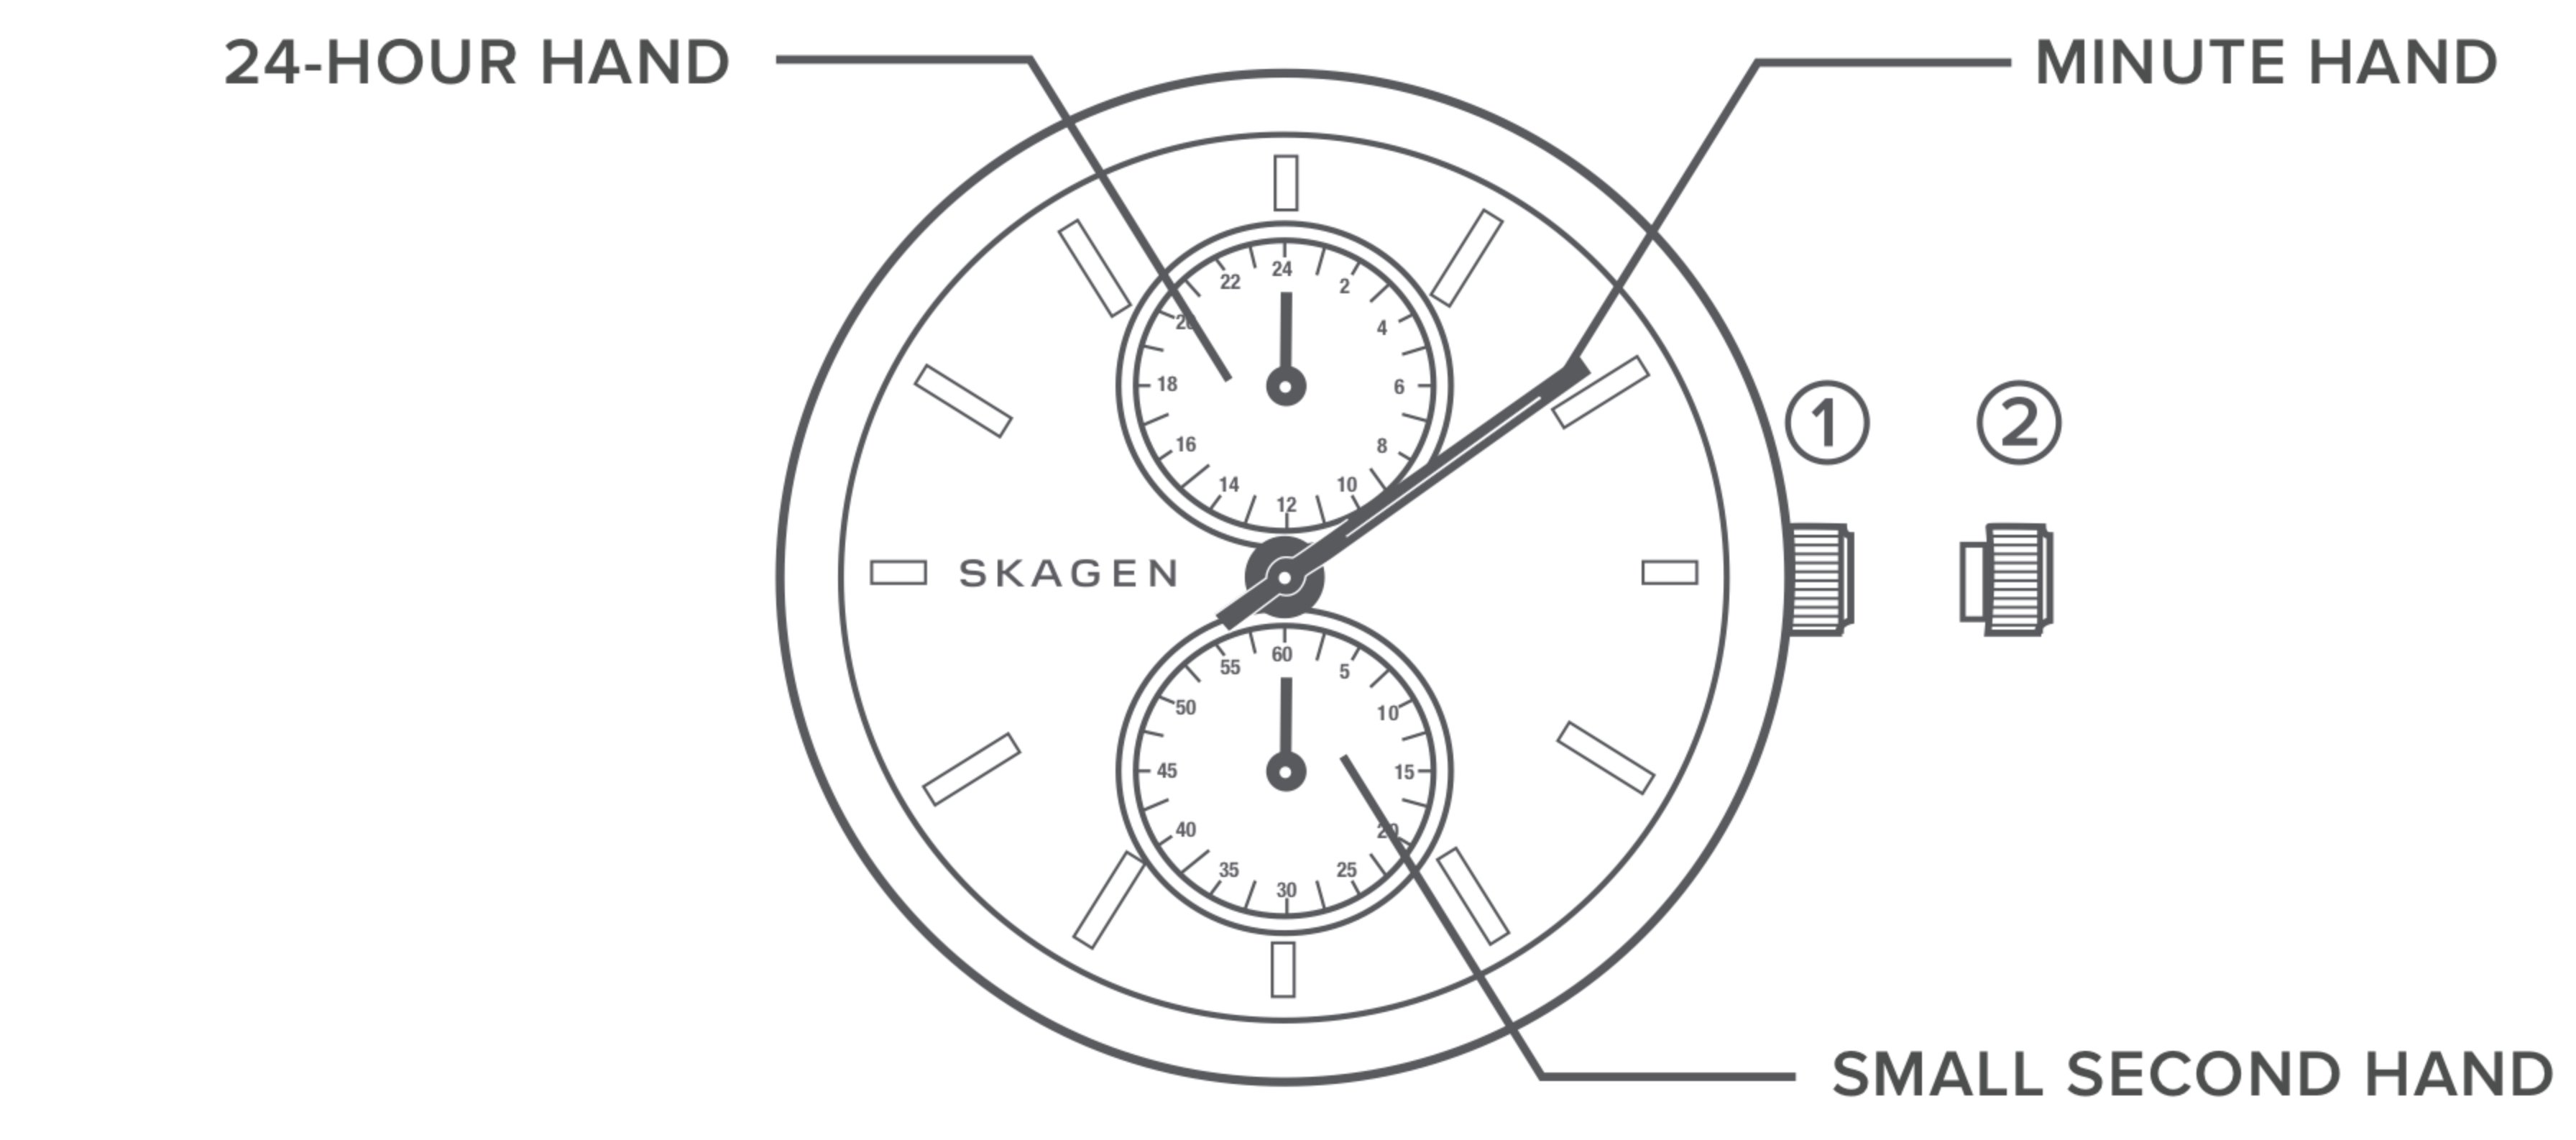
MULTIFUNCTION
SETTING THE TIME
- Pull the crown out to the 2 position and rotate to set the date. (Either clockwise or counterclockwise, depending on the model.)
- Pull the crown out to the fully extended 3 position and rotate clockwise, cycling through hours to set day. Then set time.
- Push the crown back to its normal 1 position and the day, date and time are now set.
SETTING THE TIME
- Pull the crown out to fully extended 3 position.
- Rotate the crown to set the desired time.
- Push the crown back to normal 1 position and the time is now set.
SETTING THE DAY
- Pull the crown out to fully extended 3 position.
- Rotate the crown clockwise to advance the hour and minute hands. For every two full rotations of the crown, the day will advance by one day. *If the day is set between the hours of approximately 10:00 PM and 1:00 AM, the day may not change on the following day.
- Push the crown back to normal 1 position and the day of the week is now set.
SETTING THE DATE
- Pull the crown out to the 2 position.
- Rotate the crown counterclockwise to set the date hand. *If the date is set between the hours of approximately 10:00 PM and 1:00 AM, the date may not change on the following day.
- Push the crown back to normal 1 position and the date is now set.
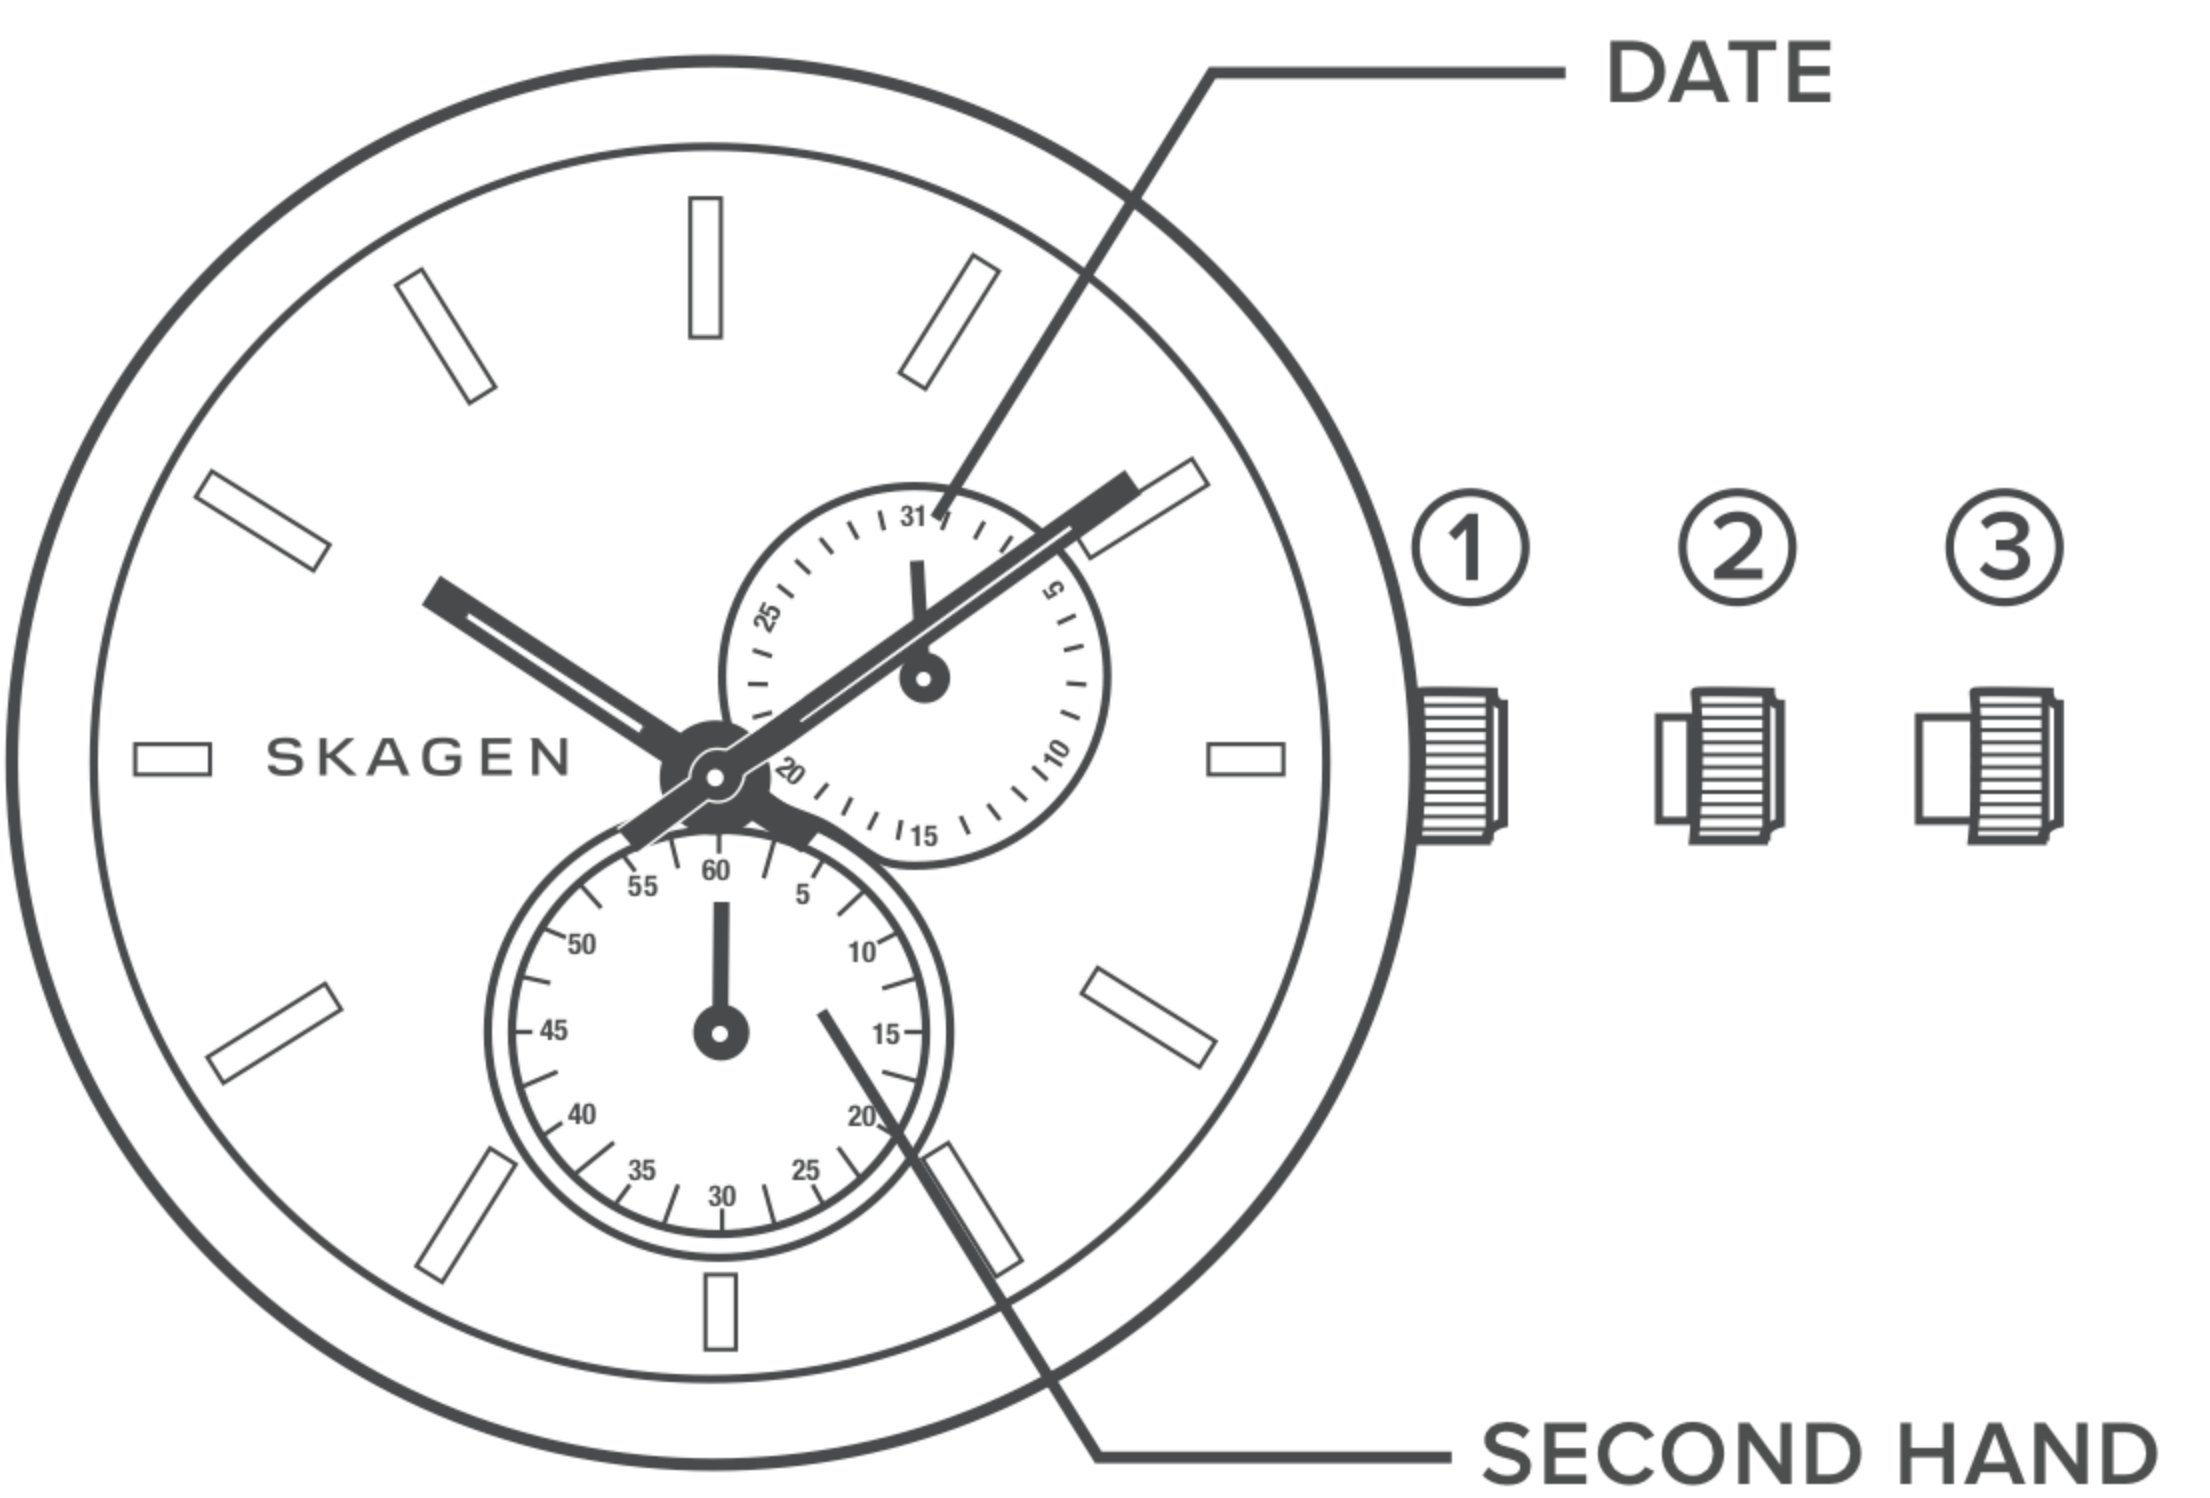
CHRONOGRAPH
NOTE: We currently offer multiple models of chronographs. Refer to the instructions for the illustration that most closely matches your watch.
Style 1

TIME SETTING
- Pull crown out to the 2 position.
- Rotate the crown to set the desired time.
- Return crown to normal 1 position and the time is now set.
USING STOPWATCH
- Press A to start/stop stopwatch and control split time.
- Press B to reset stopwatch.
NOTE: This stopwatch is able to measure and display time in 1/10 second up to a maximum of 30 minutes. Stopwatch will stop automatically after running continuously for 30 minutes.
RESETTING STOPWATCH
- Pull crown out to the 2 position.
- Press A once to set chronograph second hand to zero position.
- Once hands have returned to zero, reset to desired time.
- Return crown to normal 1 position.
NOTE: This procedure should only be performed when chronograph second hand does not to return to zero position.
Style 2

TIME SETTING
- Pull crown out to the 2 position.
- Rotate the crown to set the desired time.
- Return crown to normal 1 position and the time is now set.
USING THE STOPWATCH
- Press A to start/stop the stopwatch.
- Press B to control the split time and reset.
STOPWATCH HAND ADJUSTMENT
- Pull crown out to the fully extended 3 position.
- Press A to reset the stopwatch 1/10 second hand to the ‘0’ position.
- Press B to reset the second and minute hands. The hands only move clockwise.
- With each press of A or B, the hands move one position. They move quickly if the buttons are kept pressed.
NOTE: If the stopwatch hands function improperly, pull out crown and press A and B at the same time for more than 2 seconds. When the buttons are released, the stopwatch second and 1/10 second hands will spin around and return to ‘0’. This will indicate that the internal circuit has been reset.
DATE SETTING (ON SOME MODELS ONLY)
- Pull crown out to the 2 position.
- Rotate clockwise until desired date appears in window.
- Push crown back to normal 1 position and the date is now set.
SOLAR POWERED
The guideline of charging time is as in below.
(Dial transparency rate = 30%)
| Illumination (LX) |
Source of light | Environment | A (Approx. Hours) |
B (Approx. Hours) |
C (Approx. Minutes) |
|---|---|---|---|---|---|
| 700 | A fluorescent lamp | Inside the office | 197 | 37 | 54 |
| 3,000 | 30W 20 cm | 43 | 8 | 12 | |
| 10,000 | Sunlight | Cloud | 13 | 3 | 4 |
| 100,000 | Fine weather | 5 | 36 minutes | 1 |
Condition A: Time required for full charge
Condition B: Time required for steady operation
Condition C: Time required for 1 day’s charge
SETTING THE TIME
- Pull the crown out to the second click position when the second hand is at the 12 o’clock position.
- Turn the crown to set the hour and minute hands.
Take a.m./p.m. into consideration when setting the hour and minute hands to the desired time.- When setting the minute hand, advance it 4 to 5 minutes ahead of the desired time and then turn it back to the exact time.
- Push the crown back to the normal position.
SETTING THE DATE
- Pull the crown to the first click position.
- Turn the crown to set the date.
- Do not set the date between 9:00 p.m. and 1:00 a.m.
- Push the crown back to the normal position.
- Tips: When the date changes during daytime: this occurs because the a.m./p.m. is set incorrectly. Advance the hour hand by 12 hours.
WARNINGS / NOTIFICATIONS FOR CHARGING
RECHARGE WARNING FUNCTION: Second hand moves at 2 second intervals. The second hand changes to a 2 second interval movement to indicate insufficient recharging. After exposing the watch to light, recharging takes place and the watch returns to 1 second interval movement.
TIME SETTING NOTIFICATION: Second hand moves irregularly / 1 sec - 1 sec - 2 sec. The second hand moves irregularly (1 sec - 1 sec - 2 sec) to indicate that the time setting was not carried out after the watch stopped (due to insufficient charge). It will continue to do so until the time is set. It is advised to set the time after each sufficient charge.
A solar cell under the dial collects light and converts it to ‘electrical energy’. The energy is stored in a secondary battery, eliminating the need for battery replacement.
Expected running time from full charge to stoppage is around 6 months. When the charge has been depleted, the movement of the second-hand skips to two second intervals. Charging the watch in light will cause the second hand to return to one second intervals. If the second hand stops moving, simply place the watch in daylight until it recharges and begins keeping time again.
AUTOMATIC
MANUALLY WINDING THE WATCH
Instead of a battery, this watch contains an automatic winding movement that generates power through the movement of your wrist. It will run normally with regular wear, but not wearing the watch for several consecutive days could exhaust the power reserve.
In the event that the watch stops completely, leave the crown in its normal 1 position and rotate clockwise until you feel resistance. The watch will resume time keeping.
SETTING THE TIME
- Ensure that the watch is running, or wind it using the instructions above. Pull the crown out to the 2 position and rotate clockwise or counterclockwise (depending on model) to set desired time.
- Push the crown back to its normal 1 position and the time is now set.
A timepiece with an automatic winding movement obtains the power to wind itself from the movement of your wrist; there is no battery. Therefore, not wearing the timepiece for several consecutive days could exhaust the power reserve (in which case the watch will stop keeping time, this is normal when the watch is unused for several days). To restart the time keeping, simply wind the crown or wear the watch for some time until the seconds hand begins moving again.
WORLD TIME AND ALARM
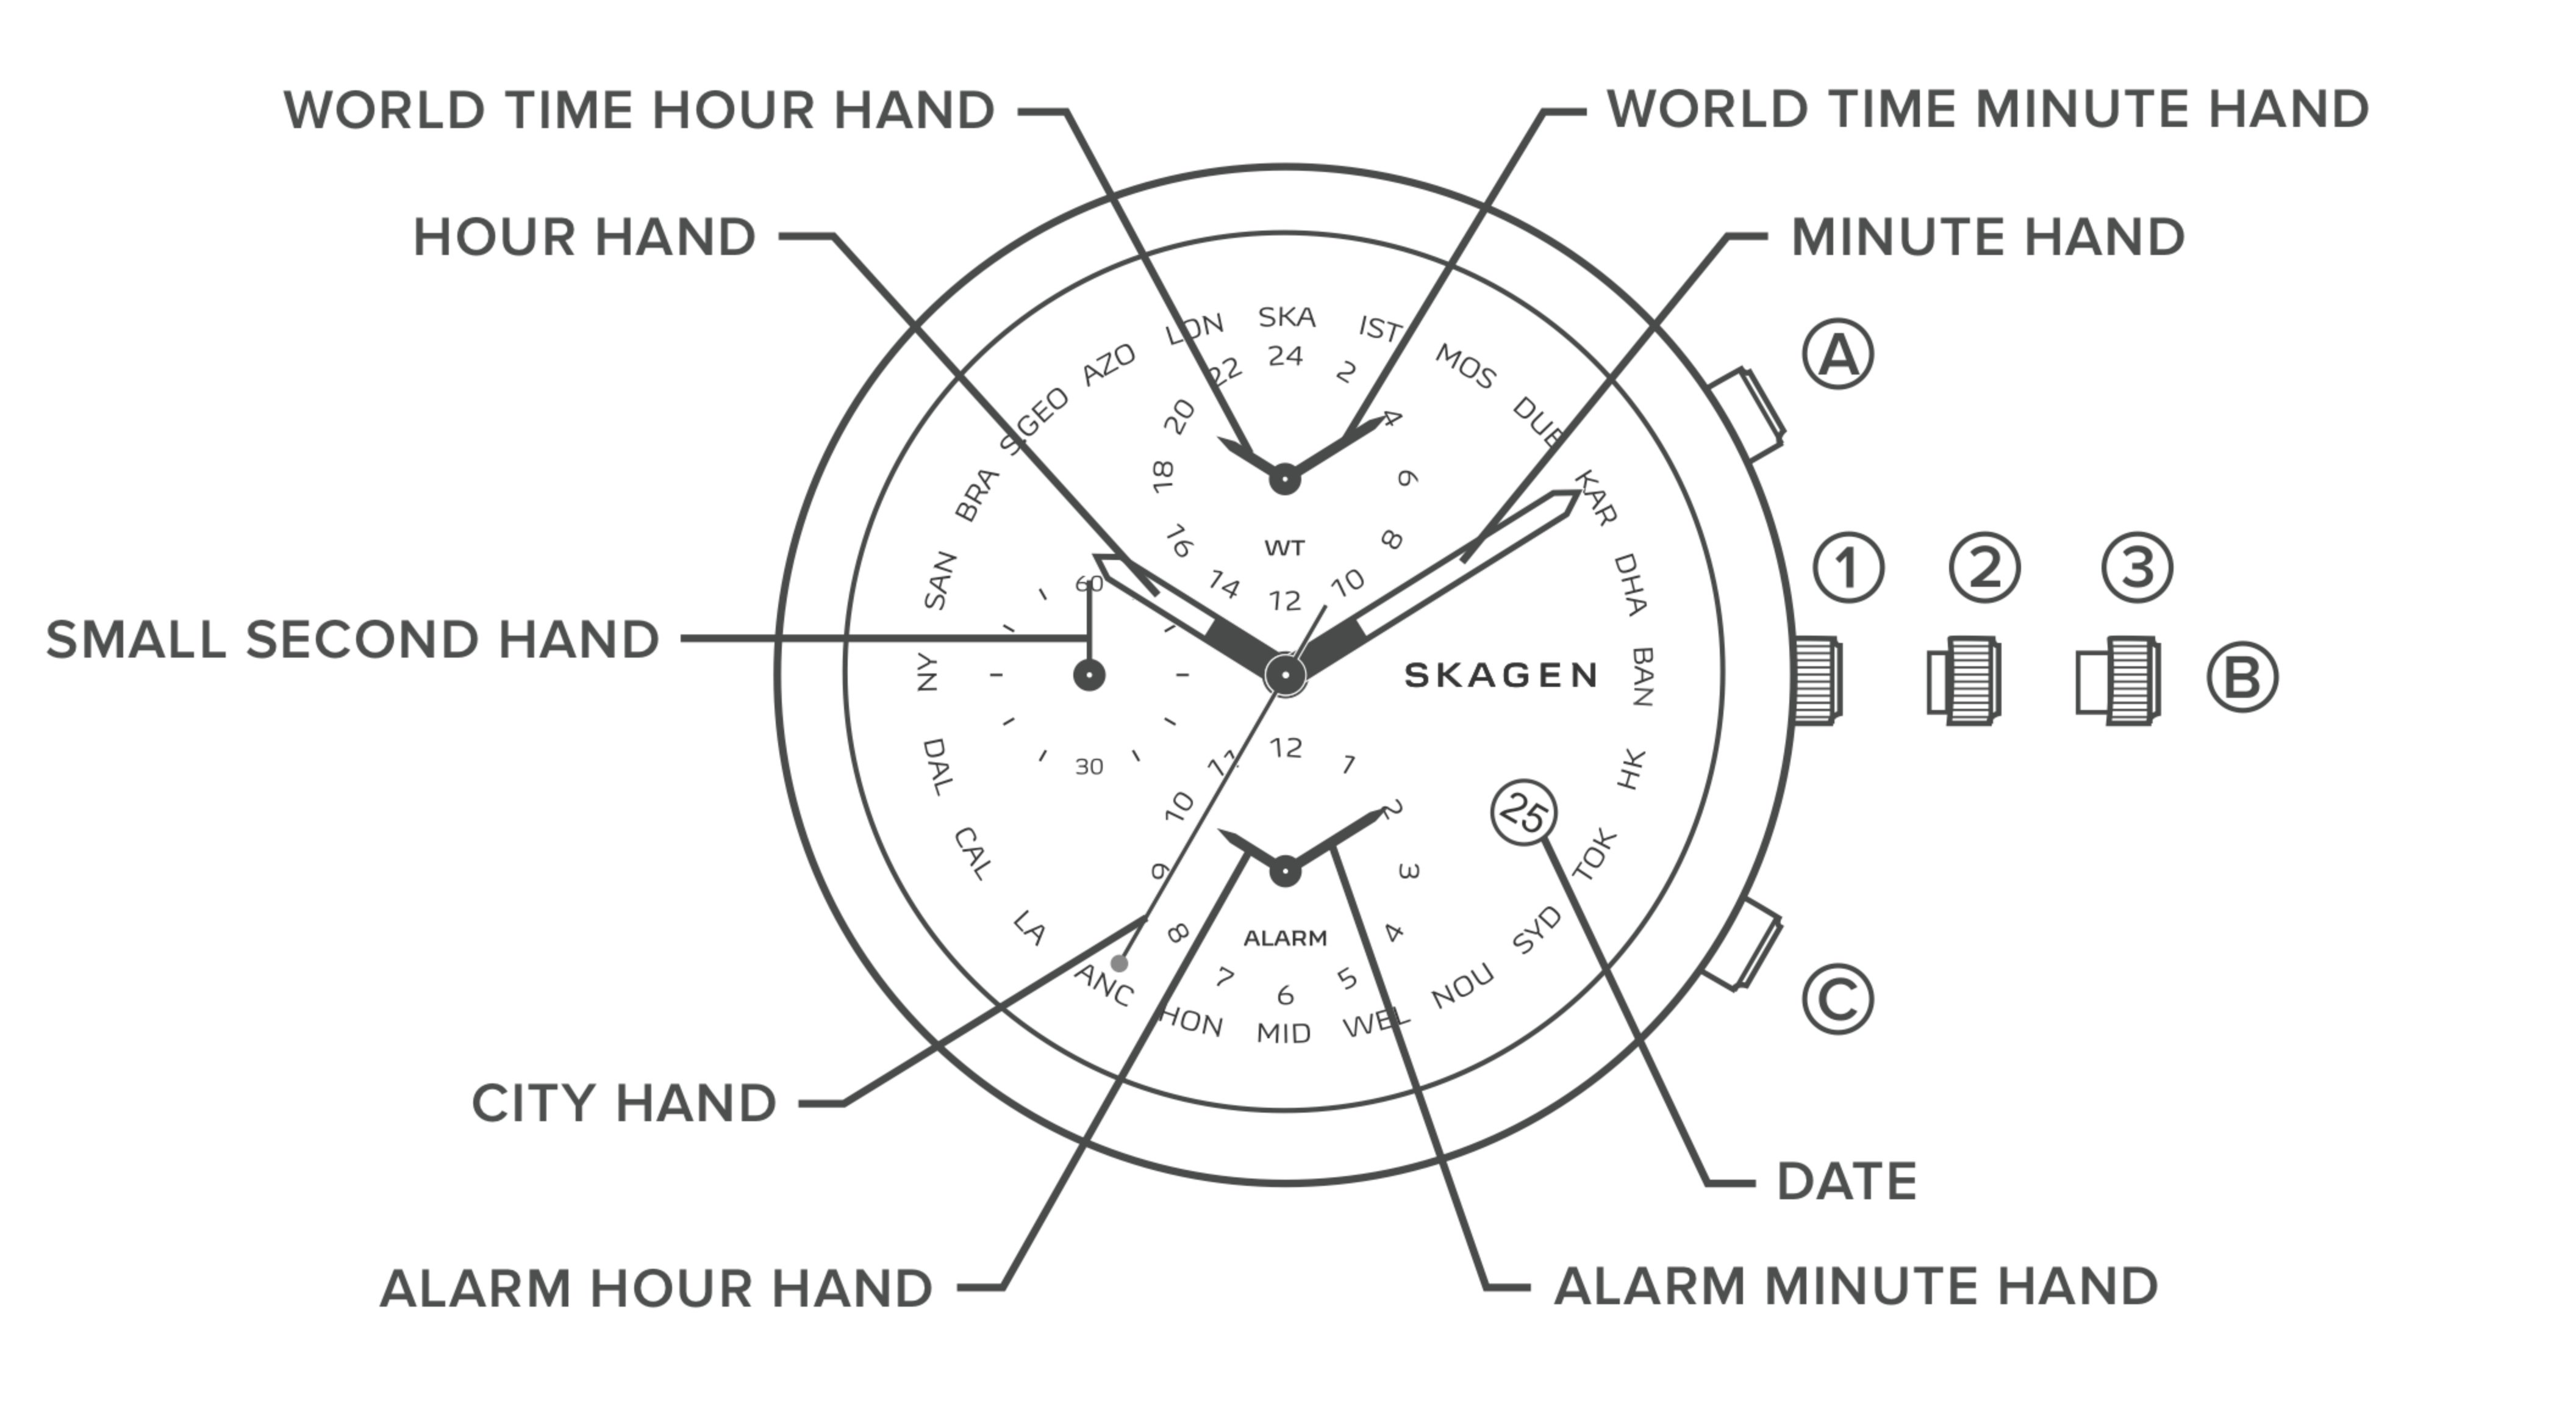
SETTING YOUR WATCH
On initial use, complete all steps below, in order and as listed, to fully set the watch. Once initial setup is complete, you may adjust settings individually as needed.
SETTING THE DATE AND TIME
- Pull the crown (B) out to the middle 2 position and rotate clockwise until the previous day’s date appears.
- Pull the crown (B) out to the fully extended 3 position when the small second hand is at the 12 o’clock position.
- Rotate the crown (B) clockwise to advance the hour and minute hands past 12:00 midnight. This will advance the date to the current date. *If the date is set between the hours of approximately 10:00 PM and 1:00 AM, the date may not change on the following day.
- Rotate crown (B) clockwise to set desired time.
SETTING THE ALARM
- With the crown B pulled out to the fully extended 3 position, press the (C) push-button repeatedly (or hold down) to set the alarm hands to current time.
SETTING THE CITY HAND
- With the crown (B) pulled out to the fully extended 3 position, press and hold the (A) push button for 2 seconds. The city hand turns a full round.
- Press the (C) push button to set city hand to the desired city for which you know the current time. It is best to use the city in the same time zone as your home city.
SETTING THE WORLD TIME HANDS
- With the crown (B) pulled out to the fully extended 3 position, press and hold the (A) push button again for 2 seconds. The world time hour and minute hands now turn a full round.
- Press the (C) push -button repeatedly (or hold down) to set the world time hour and minute hands to indicate the time in the city you selected for the city hand. *Note: World time subdial operates on military time.
- Push the crown back to its normal 1 position. The watch is now set.
- Watch is now set and ready for use.
*To reset only the world time hands after initial setup, first complete Step A in the instructions for SETTING THE CITY HAND. Skip Step B and go straight to instructions for SETTING THE WORLD TIME HANDS.
OPERATING YOUR WATCH
USING THE WORLD TIME FUNCTION
Use push button A or C to adjust city hand and corresponding world time hands forwards or backwards.
USING THE ALARM
- Before using the alarm, ensure that the alarm hands are adjusted to indicate the current time.
- Pull the crown B to the middle position 2. Press push button C repeatedly (or hold down) to set the alarm hands to the desired alarm time. *Note: The alarm cannot be set for a time that is more than 12 hours ahead of the current time.
- Push the crown B back to normal position 1. Alarm is now set.
- Alarm indicates that it is turned on when hands indicate designated alarm time. Alarm indicates that it is turned off when hands indicate the current time.
SILENCING ALARM
- At the designated time, the alarm will chime for 20 seconds, at which point alarm will turn itself off.
- To silence alarm manually, press any button while it chimes. (While alarm is chiming, pushbuttons will only work to silence alarm; they will temporarily not control other functions.)
CANCELLING ALARM
- Pull the crown B to the fully extended position 3.
- The alarm hands will return to indicate current time, signalling alarm is now off.
- Push crown B back to normal position 1.
PREVIEWING ALARM CHIME
- Pull crown B out to middle position 2.
- Press and hold push button A for 2 seconds. The alarm chime can be heard while the push button is kept pressed.
- Push crown B back to normal position 1.
GLOSSARY OF CITIES
HON — Honolulu, Hawaii, U.S.
ANC — Anchorage, Alaska, U.S.
LA — Los Angeles, California, U.S.
CAL — Calgary, Alberta, Canada
DAL — Dallas, Texas, U.S.
SAN — Santiago, Chile
BRA — Brasília, Brazil
S.GEO — South Georgia, British Overseas Territory
AZO — Azores, Portugal
LON — London, England, U.K.
SKA — Skagen, Denmark
IST — Istanbul, Turkey
MOS — Moscow, Russia
DUB — Dubai, U.A.E.
KAR — Karachi, Pakistan
DHA — Dhaka, Bangladesh
BAN - Bangkok, Thailand
HK — Hong Kong, China
TOK — Tokyo
SYD — Sydney, Australia
NOU — Noumea, New Caledonia
WEL — Wellington, New Zealand
MID — Midway Islands, U.S.
2-Hand Disc Movement
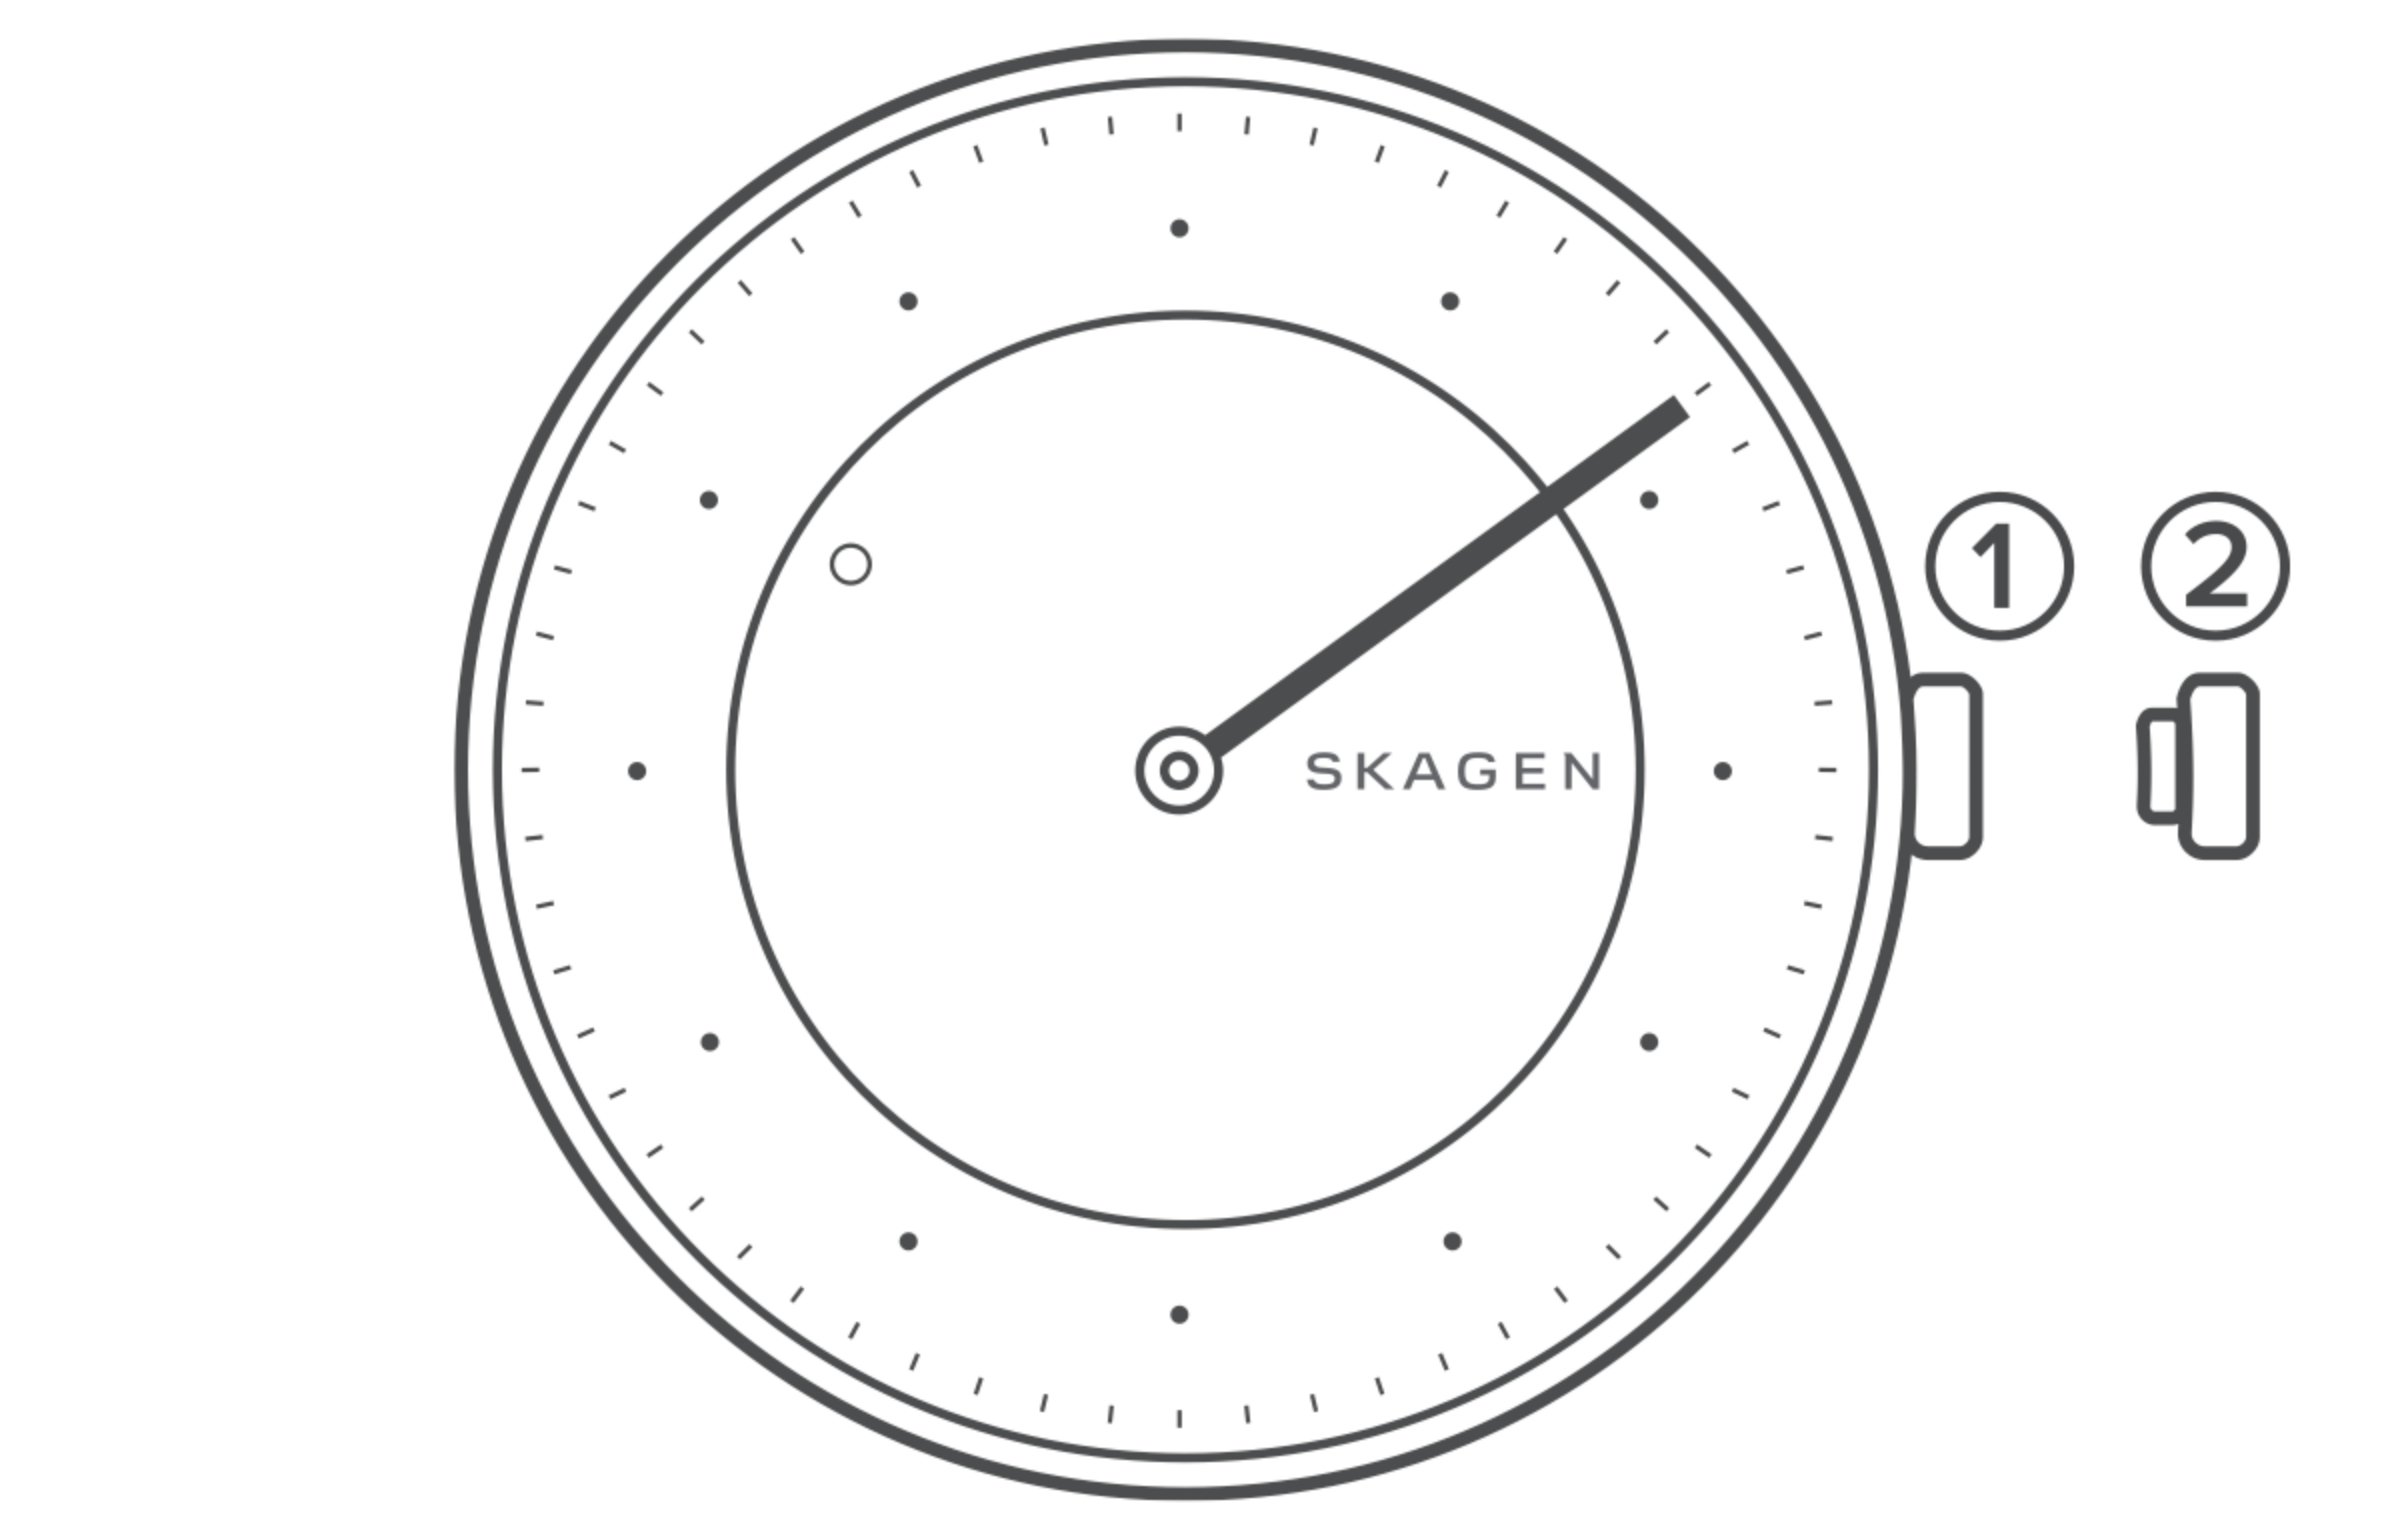
- Pull the crown out to the fully extended 2 position and rotate to set the desired time. Rotating the crown will adjust the disc, or hour hand and minute hand accordingly.
- Push the crown back to its normal 1 position and the time is now set.
SUN & MOON
Setting the Time and Day of the Week
- Pull the crown out to position 2 when the second hand is at the 12 o'clock position.
- Turn the crown clockwise to advance the hour and minute hands until the day hand is set to the desired day of the week.
- The day hand will not move back by turning the crown counterclockwise.
- Turn the crown to set the hour and minute hands.
- The sun & moon rotary disc moves correspondingly with the hour hand.
- When setting the hour hand, check that the sun & moon rotary disc is correctly set.
- When setting the minute hand, advance it 4 to 5 minutes ahead of the desired time and then turn it back to the exact time.
- Push the crown back to position 1 to set the time and day of the week.
Setting the Date
- Pull the crown out to position 3.
- Turn the crown clockwise to set the date hand.
- Do not set the date hand between 9:00 p.m. and 1:00 a.m.; otherwise, it may not change properly.
- The date hand will not move back by turning the crown counterclockwise.
- Push the crown back to position 1 to set the date.
DUAL TIME
Setting the Date
- Pull the crown out to position 2.
- Turn the crown clockwise to set the date. If the date is set between 9:00 PM and 1:00 AM, the date may not change on the following day.
- Push the crown back to position 1 to set the date.
*Note: position 2 should not be used if no date window is present on the dial
Setting the Time
- Pull the crown out to position 3.
- Turn the crown clockwise to set the hour and minute hands.
- Push the crown back to position 1 to set the time. The second hand will begin to run when the crown is pushed back to position 1.
Setting the Dual Time
- Press button ‘a’ to set the dual time hand forward in units of 15 minutes.
- Press button ‘b’ to set the dual time hand backward in units of 15 minutes.
Hour and Second Subeye
Setting the Time
- Pull the crown out to position 2.
- Turn the crown to adjust to the correct hour and minute.
- Push the crown back to position 1 to set the time. The small second hand will begin to run when the crown is pushed back to position 1.
Dive Watch
Setting the Time
- Turn the crown counterclockwise repeatedly towards 6 o’clock to unscrew the crown. When the crown reaches position 2 and will not unscrew any further, pull out the crown to position 3.
- Turn the crown to adjust to the correct hour and minute.
- Push the crown back to position 2 to set the time. The small second hand will begin to run when the crown is pushed back to position 2.
- Turn the crown repeatedly towards 12 o’clock to screw back towards the watch continue screwing the crown until it locks. Apply slight pressure to return the crown completely to position 1. Always ensure the crown is screwed down when exposing or submerging the watch in water
Measuring the Time - Time Elapsed (count up timer)
- Rotate the bezel counterclockwise to align (the 2-dot marker) with the minute hand.
- Use the indicators on the bezel to determine the time elapsed.
Measuring the Time - Time Remaining (count down timer)
- Rotate the (the 2-dot marker on the) bezel counterclockwise the align with the upcoming schedule time.
- Use the indicators on the bezel to determine the time remaining.